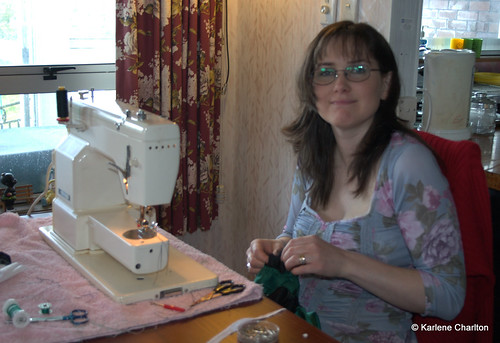
A glimpse of my work-in-progress
This is something I have been working on for a while now. Almost done, just got to do a few more fabric roses.
The peach fabric used in the photo above are the leftover pieces from the skirt I shortened here.
It’s turned out very differently from my original idea but still very pretty all the same. Can you guess what it is?
I Confess…
Well this is kind of embarrassing. Not only have I not posted anything in AGES, this post is to confess that I went shopping and purchased some new stuff. So for the first time, here is my get out of jail free card.
It is mid-winter here in NZ and I was feeling very cold, so I bought a couple of merino thermal shirts, (on sale!) a knit jumper/jersey and a fine knit cardi. In my defense, I did think about making some merino shirts but I knew that by the time I got around to finding the fabric and then making the things, winter would be almost over. And the fabric costs as much to buy as the shirts themselves did!
I have been refashioning a few things, mostly denim skirts and am waiting to get some nice model shots before I post pictures.
At last – pictures of the fairy princesses
Remember all those frilly girly things I made for my nieces for Christmas? Well, I finally got some pictures of them all wearing the outfits. At Easter! The sun was very bright which is why some of the expressions are not very fairy princess like
Here is Alyssa who is wearing a beaded necklace I made for her a few years ago and had completely forgotten about:
Next Rylee, squinting very badly, she was having a good time, honest!
And lastly Briana. Her bag is from an op shop, I re-covered the back. I love the fact that she is wearing tattoos on her arms LOL, drawn on by her dad.
The tops they are wearing are all bought from op shops and inspired the rest of the outfits. Alyssa’s one is a bit see through so she is wearing a T-shirt underneath with a butterfly print. Pretty!
Fairy skirts made by Cathy
I had some comments recently from Cathy McGregor from Napier who sent me some lovely pictures of the fairy skirts she has made for her granddaughters from old scarves.
The gold coloured organza fabric which is used in both skirts is from a wrap/stole she made for a wedding, and the spotted lemon scarf was her mothers.
The pale blue narrow strips with sequins added to the ends, is from a scarf/large bow previously attached to a 1950’s hat of her aunts.
As well as scarves, she is also using her collection of sarongs to make the skirts. Thanks for sharing these cool ideas Cathy, I will be looking out for scarves and things from op shops myself in future!
Some more tips from Cathy:
Firmly tack the inner circle (waist) before cutting around the template when using slippery fabrics.
Use bias cut strips to make the casing.
Have a look at my fairy skirt tutorial for more details on how to make this style of skirt.
I took the wardrobe refashion pledge – for life!
After a a four month pledge and then a little break I have decided to take the plunge and sign on for LIFE, yay!
The Pledge
I _Karlene_ pledge that I shall abstain from the purchase of “new” manufactured items of clothing, for life. I pledge that i shall refashion, renovate, recycle preloved items for myself with my own hands in fabric, yarn or other medium for the term of my contract. I pledge that I will share the love and post a photo of my refashioned, renovated, recycled, crafted or created item of clothing on the Wardrobe Refashion blog, so that others may share the joy that thy thriftiness brings! Signed_K. Charlton_.
I didn’t find it hard at all to avoid buying new clothes. What was hard was trying to have something to post every week! Now I’m committed.
Fancy handbag part two
We’ve had a busy couple of weeks here getting organized to go to our friends wedding last weekend. We had to travel a long way, 7hrs drive to the grandparents, chit chat and drop off kids, next day another 3hrs to where we are staying. Keith is the official photographer and wants to go to the rehearsal which we miss, never mind we still get to go over venue for photo opportunities. Wedding day starts off with bad weather and photographer is worried, but clears up in time for ceremony and turns out great. And he got some lovely photos, good job dear!
Next two days are spent traveling home again, its now 4 days later and we’re still not fully unpacked. I have a huge mountain of washing to sort and fold up and the boys are running out of clothes.
Good news, got the bag finished in time to take to the wedding. Well, just, I left off any type of fastening and didn’t have time to pin stitch the flap.
I had to sew the lining twice due to doing it wrong way around with interlining on the inside (the wrong side!) the first time, whoops.
Had lots of fun with the trimmings on the front flap. Stage one, the net over lay.
Next, the ribbon and cord trimming.
Then beaded loops and we’re done. And the final finished product!
I was careful to get the lining of the flap with the picture up the right way when the bag is open.
Here I am wearing it at the wedding with my matching dress, a birthday gift from Mum.

And a close up of the flap, for those like me who strain their eyes and put their noses to the screen to take in the details,
I love my new little bag, can’t wait to take her out again
Really big beach bag
Have a look at the really big tote bag for the beach/picnicking in the park that I finished last week.
I was so keen to get sewing it that I forgot to take any photo’s of what the materials used to look like, which I am now kicking myself for.
The apple print fabric was the skirt part of a little girls dress, I just unpicked it from the top bib part and cut of the side seams. For some reason it was made with the print upside down! This was a bonus for me as it meant it was the right shape I wanted for my bag when turned the right way up.
The red corduroy fabric was from a pair of toddlers overalls that have been in my fabric hoard for years, I think my little brother may have worn them at some stage; obviously not for very long though as they were like new.
The pattern I made for this was fairly basic, just two sides joined together and boxed out at the bottom. I also lined it and put in a little patch pocket, taken straight off the overalls.
Now I’m off to the beach, the weather is lovely here in Auckland…well actually today it’s a bit cloudy but it’s still very hot.
Fancy handbag – a work in progress
I am currently in the process of making a handbag to take to a wedding this month. The fabric I’m using is from my Nana’s stash, and just happens to be the exact shade of turquoise as the dress I want to wear (a birthday present from my mum, thanks Mum!). For the lining I am using a lovely vintage cotton print that was also in my Nana’s stash (thanks Nana!). Some of it was already cut out into a shape that looked like a little girls dress, with button up straps. I had often wondered who Nana was making the dress for, and why it was never finished. When I asked Mum about this and she said she thought it may have been for me. I’m going to smile and think of my Nana every time I open this bag.
So far I have cut all the pieces out and sewed the main pieces together, boxing out the bottom.
During the school holidays I also spent a bit of time making all these little fabric flowers and yo yo’s that are going to be stitched on the front flap.
Rastus Rooster
I sewed this rooster for my baby nephew as a Christmas gift. The pattern was created by Web Stitch Needlecraft designs.
I had to make a few changes to make it more baby proof as they are not actually intended as a toy. I left out the wire that is supposed to be in the top feathers, used some fabric scrap in the body rather than the recommended plastic pellets, and I hand sewed a fabric beak instead of painting it on with acrylic.
This was quite a fun project to do. I would recommend this only to people confidant in their sewing ability as some of the instructions are complex to follow.
It was hard to tell if my nephew liked his present or not, as he was much more interested in the box that it came it! Typical


