Applique – The Karlene way
This is the method I use for doing applique, sewing small shapes onto a background, with no need for solvy or other fancy water soluble interfacing.
It works best on natural fibers such as cotton and wool.
The background or base fabric needs to be fairly firm, if not then use some interlining, stabilizer or fusible interfacing. (I usually don’t bother)
The fabric being used for the applique shapes will need to have fusible interfacing. Press your fabric, then iron on the interfacing (on the wrong side of fabric) on the hottest setting the fabric can withstand.
The time taken to bond will vary, check instructions for interfacing if you have them. I press down with the iron for about 4 seconds in each spot until the fabric has been covered, then repeat this process until the fabric and interfacing are well and truly stuck, usually about 3 times.

Next draw around your applique template with tailors chalk, a quilting pencil or a fabric pen with disappearing ink.
I use card to make my templates, you can use anything you like really, as long as it will last being drawn around over and over.
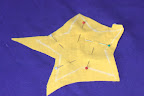
Draw as many shapes as you will need, then roughly cut them out leaving a cm or two around the edge.
Pin the shapes in place on the background. Not too many pins, just enough to hold in place.
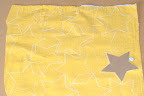
Using a straight stitch, sew along the outlines removing the pins as you go.
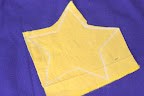
Carefully cut away the excess fabric without cutting the stitching.

Now for the fun part!
Set your sewing machine on zig zag or V stitch, with a short stitch length, there should be an F setting for fine or satin stitch. Experiment on a piece of scrap (same fabric you are using, fused) to get the right stitch length needed. On my machine I have the length just before the F setting, as it can be very slow and gets stuck easily, making a terrible mess of the fabric, grr.
Ok got the stitch right? Good, now flick the zig zag bit back to straight. Sew 2 or 3 stitches along the outline then reverse. Turn wheel until needle is up, and switch back again to zig zag stitch. Stitch around the outline, keeping the original sewing line in the middle of the zig zags.
Corners
For innie corners, stop and pivot with the needle in the fabric on the left side.
For outie corners, stop and pivot with needle on the right side.
To finish, switch back to straight stitch again and sew back and forth a few stitches like you did at the start.

Obviously this will take a little bit longer that using other types of fusing where you peel the back off and stick it on before you sew. This is about doing things the old fashioned way, with what you have on hand rather than buying extra stuff you don’t really need.

-

-

I took the pledge for life!

My online store on felt: