Basic fairy skirt tutorial
Posted on 24 July 2009
I made a basic fairy skirt to wear to a theme party about three years ago and enjoyed wearing it so much that I wished I had made one sooner instead of waiting for a occasion to wear one. Every day should be a fairy skirt day!
I would like to share the technique I used. It’s a fairly quick and simple way of making a dress up skirt for children – or yourself – if you don’t like shop bought ones.
You will need at least two layers of fabric cut into squares, roughly one metre squared will give you a length approximately to the knee on an adult. You can make the squares larger or smaller depending on how long you want the skirt to be and how wide your fabric is.
I used four layers, first – purple satin lining (goes on the bottom), second-mauve nylon organza, third-purple net/tulle, and fourth (top)-mauve organza with a sparkly star print.
You can use whatever type of fabric you want,but I would recommend using something non-see through on the bottom.
Layer the fabric on on your table or floor alternating between “square” position and “diamond”.
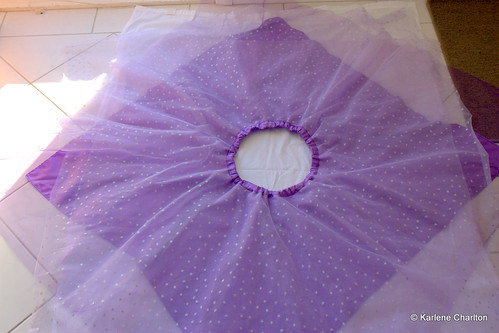
Now you will need to cut a hole in the centre big enough to go over the hips.
Hip measurement plus ease divided by 6.28 will give you the radius measurement to draw a circle with a compass, eg. hip measurement of 94cm plus 3 cm ease (97cm) divided by 6.28 equals 15.45cm, get a compass and set it to 15.45cm, draw a circle, and the circumference should be about 97cm.
Use the circle as at template to centre over the squares/diamonds and cut hole. Ok, back up a bit. Before you lay your squares out, fold each one in half, then in half again to find the centre. You can then use the dot from the compass in the middle of your template to line up with the corner that is the centre of the square and cut through four layers, using a quarter of the template. Or you can fold/cut your template into quarters and place on top edge to edge, then cut. Do this for each layer. If you are very brave, or have a fancy cutting tool you could do all the layers together. Pins are allowed – just don’t hit them with scissors, they don’t like it.
Make a casing for elastic by cutting a strip of fabric as long as the circumference of the circle plus 2cm seam allowance, approx 6cm wide, and stitch together. Cut elastic to fit waist measurement and join up, fold casing in half right sides out and attach to skirt with elastic inside.
This can be tricky, you can attach casing first if you want, leaving an opening for elastic and then thread the elastic through. Personally, I think that way is even more tricky, its up to you 🙂
You could also just use some matching ribbing or knit fabric for a waistband, as long as it doesn’t stretch too much after sewing on to the skirt. We wouldn’t want our fairy to have her skirt falling down!
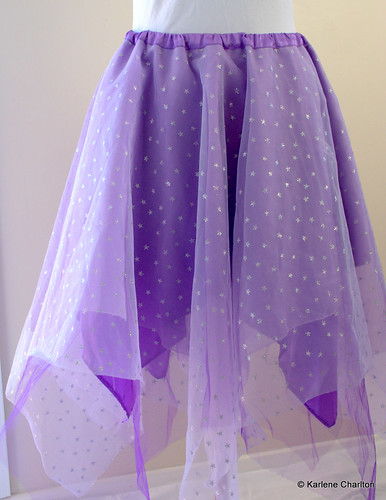
Now add a pretty top, some wings and a wand and off you go.

-

-

I took the pledge for life!

My online store on felt:

Pingback: 48 + Free Skirt Tutorials | frugalandthriving.com.au()
Pingback: September in the Rain | terrallectualism()